Quantcast
Channel: GlobalSCAPE Knowledge Base
Viewing all 479 articles
Browse latest View live

LDAP User Name Validation Configuration

$
0
0

THE INFORMATION IN THIS ARTICLE APPLIES TO:

  • Mail Express v4.0.2

DISCUSSION

This document will provide guidance for using LDAP user name validation configuration feature available in Mail Express 4.0.2.

Removing/Changing Mail Express Email Validation

The user name validation configuration parameter is located in the staticConfig.xml file, located in the Mail Express installation directory (e.g., C:\Program Files\Globalscape\Mail Express\webapps\ROOT\WEB-INF\classes\META-INF). By default, the validation allows all valid LDAP characters (per RFCs 2254 and 4515). When values are defined within the configuration file, user names with any of the specified characters present will be immediate rejected.

To replace edit the user name validation configuration

  1. For backup purposes, make a copy of staticConfig.xml file and then paste it in the same directory. It will be saved as Copy of staticConfig.xml.
  2. Locate the following section in the staticConfig.xml file:
<!--
Some LDAP providers may not correctly handle all allowed values in an LDAP query.
This allows you to specify characters in a username that should cause immediate rejection.
This will reject the request, not encode the characters. Below values must be xml
escaped (e.g., '<' is <value>&lt;</value>).
-->
<bean id="MailExpressLDAP.usernameProhibitedCharacters" class="java.util.HashSet">
<constructor-arg>
<set>
</set>
</constructor-arg>
<meta key="Description"
value="usernameProhibitedCharacters - Specifies a set of characters that will cause rejection of an authentication attempt in LDAP auth." />
</bean>

Enter values to be restricted between the <set> and </set> lines. Values must use any XML predefined entities for double quotation, ampersand, apostrophe, less-than and greater-than. For example, to specify the ampersand (&), you would use &amp; but for a space, you can just specify an empty space.

The example below restricts <, >, ", &, !, ? characters and spaces:

<!--
Some LDAP providers may not correctly handle all allowed values in an LDAP query.
This allows you to specify characters in a username that should cause immediate rejection.
This will reject the request, not encode the characters. Below values must be xml
escaped (e.g., '<' is <value>&lt;</value>).
-->
<bean id="MailExpressLDAP.usernameProhibitedCharacters" class="java.util.HashSet">
<constructor-arg>
<set>
<value>&lt;</value>
<value>&gt;</value>
<value>&quot;</value>
<value>&amp;</value>
<value>!</value>
<value>?</value>
<value> </value>
</set>
</constructor-arg>
<meta key="Description"
value="usernameProhibitedCharacters - Specifies a set of characters that will cause rejection of an authentication attempt in LDAP auth." />
</bean>

After making your changes and saving the staticConfig.xml file, restart the Mail Express Server Service.


Installing or Upgrading EFT in a Failover Cluster

$
0
0

THE INFORMATION IN THIS ARTICLE APPLIES TO:

  • EFT v6 and later

DISCUSSION

EFT can be installed in an active-passive cluster for failover clustering. Separate instructions are provided belowfor installing and upgradingEFT in a cluster. (TIP:Print this topic and check off the steps as they are completed.)

Installing EFT in a Failover ClusterConfiguration

Before you add EFT to your cluster, you must setup your cluster manager. Please consult your cluster manager vendor’s documentation for details. Globalscape's Server Support team can provide assistance with basic configuration questions, and Globalscape Professional Services group provide assistance with installing and configuring a cluster.

To install an EFT version 6 or later in a cluster configuration:

Step

Owner

  1. Setup Microsoft Failover Clustering, Symantec’s Veritas Cluster Server, or other third-party cluster manager according to your cluster manager vendor’s documentation.

  1. Make sure the node that you are installing on has access to the shared resource disk (i.e., the clustered disk or clustered storage pool or Cluster Shared Volume (CSV), as appropriate to your cluster environment.

  1. Run the EFT installer on the node that has access to the clustered (shared resource) disk. Follow the prompts and refer to Installing the Server, Interface, and Modules, if necessary.

  1. On the Choose install type page, click Part of a cluster, then click Next. When the confirmation prompt appears, click Yes to confirm that you have read the cluster documentation.

  1. A prompt appears asking "Is this the first node in the cluster?" Do one of the following:

    • Click Yes if this is the first node in the cluster.

    • Click No if you already installed EFT on the first node and you are now installing EFT on the second node.

  1. On the Choose Install Location page, specify the installation location on your local physical drive, and then click Next.

  1. On the Choose EFT Enterprise configuration data location page, specify the shared resource disk, and then click Next.

  2. Note: If you cannot browse to the shared resource disk, then the clustered disk is offline or assigned to the other node. CANCEL the installation and verify that the clustered disk can be accessed on the node you are installing on, and then restart the installation process.

  1. Follow the prompts in the wizard to continue the installation (create the EFT administrator account, configure ARM, etc.).

Note: You must specify a remote SQL or Oracle server for the ARM database. Do not use a local database, such as SQL Server Express.

  1. On the final page of the installer, ensure that the Start the EFT Enterprise service check box is NOT selected, and then click Finish.

  1. Use the third party's cluster administrator tool to move (assign) the clustered disk resource to the second node.

  1. Repeat steps 3– 9 on the second node. (Be sure to click No in step 5.)

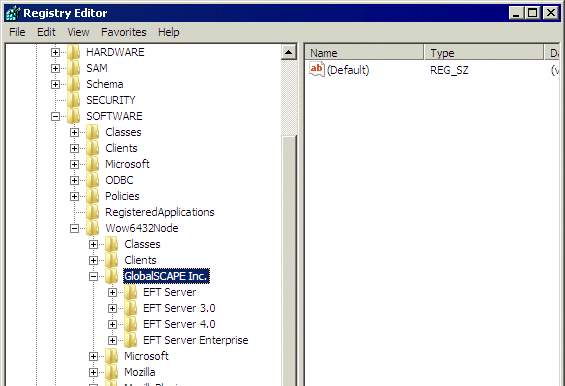
  1. On the second node, use the third-party's cluster administrator tool to create a new clustered role: generic service > EFT Enterprise, linked to the desired shared resource drive (described in step 2), optionally replicating the following registry settings in HKLM\SOFTWARE\Wow6432Node\GlobalSCAPE Inc.

  1. Once the role is created, the EFT service on the second node will be started by the cluster. Launch the EFT administration interface, connect to the EFT on the second node, configure EFT, and license the product and any add-on modules.

Note: Make sure you specify a Site root folder on the shared resource drive when creating your first Site. (For example: Site Root = H:\Data.)

  1. Once you have configured EFT to your liking, make the first node in the cluster the group owner, then license EFT and any add-on modules in that node. (Notice that EFT on the first (primary) node picks up all configuration done to the second node, because the nodes share the configuration files.)

Upgrading EFT in an ExistingCluster

To upgrade an EFT version 6.4 or later that is alreadyinstalled in a cluster configuration:

Step

Owner

  1. Gather your credentials: EFT administrator and SQL or Oracle database owner (unless using Windows authentication).

  1. Perform rollback and disaster recovery (DR) operations:

    1. Run EFT's Backup Server Configuration tool (available in Enterprise only).

    2. Backup your entire EFT configuration folder located on the shared resource drive.

    3. Backup your database (performing purging, if necessary).

    4. (Optional) Route traffic to your DR site to avoid downtime.

  1. Open the third-party cluster administrator tool and take the cluster offline. Also take the EFT Enterprise clustered role (formerly called "clustered applications and services") offline.

Note: Microsoft’s failover cluster will bring down the disk resource when the role is stopped. You may need to detach the clustered disk from the role and bring the clustered disk resource back online so that the installer can write files to the clustered (shared resource) disk.

  1. Run the EFT installer on the node that has access to the clustered (shared resource) disk.

  1. On the Prior version detected page, click Upgrade cluster, and then click Next. When the confirmation prompt appears, click Yes to confirm that you have read the cluster documentation.

  1. A prompt appears asking "Is this the first node in the cluster?" Do one of the following:

    • Click Yes if you are upgrading the first node in the cluster.

    • Click No if you already upgraded the first node and are now going through the steps again for the second or Nth node.

  1. On the Choose Install Location page, verify that the DestinationFolder matches the current program install directory, typically C:\Program Files\Globalscape\EFT Enterprise, and then click Next.

  1. On the Auditing and Reporting database configuration page, click Configure Auditing and Reporting (most likely) or skip if auditing is not being used (rare). Click Next.

  1. Click Use existing SQL Server or Use existing Oracle database, as appropriate, and then click Next.

  1. Click Upgrade an existing EFT ARM Database, and then click Next.

  1. Provide your database credentials if using SQL or Oracle authentication, otherwise click Windows authentication. Click Test to verify your database connection. After the database credentials have been verified, click Next.

Note: Do not proceed with the installation if you are unable to validate your database connection. Contact Globalscape support or your database administrator for further assistance.

  1. On the Confirm Database Upgrade page, verify that all upgrade requirements have passed. Once verified, select the check box to confirm your understanding of the upgrade process, and then click Install.

  1. On the final page of the installer, ensure that the Start the EFT Enterprise service check box is NOT selected, and then click Finish.

  1. Use the third-party cluster administrator’s tool to move (assign) the clustered disk resource to the second node.

  1. Repeat step 4-14 above on the second node, making sure to click No in step 6 when the prompt asks "Is this the first node in the cluster?" You will not be prompted to upgrade the database for the second node.

  1. Once the second node has been upgraded, use the third-party cluster administrator to reattach the clustered disk resource to the EFT resource role, then subsequently bring the role and cluster back online.

  1. If applicable you can start routing traffic back from the DR site to the primary. Repeat the cluster upgrade procedure on the DR site once you feel confident with the new version.

Using a script to export a list of Secure FTP/EFT Server users to Excel

$
0
0

THE INFORMATION IN THIS ARTICLE APPLIES TO:

  • EFT Server (All Versions)
  • Secure FTP Server (All Versions)

QUESTION

How can I use a script to export a list of Server users to Excel?

ANSWER

Following is a sample script that gets a list of users using the COM interface.

  1. Download CreateUserListSpreadSheet.txt or copy the script below into Notepad.
  2. Modify the server administrator login information as necessary
  3. Save the script with a .VBS extension
  4. At a command prompt, use CSCRIPT to run the script or, in Windows XP and newer operating systems, double-click the file to execute the script.

**Be sure to edit the script to change the Server, Port, Username, and Password to your Server's settings. Remove any extra blank lines introduced when you copy and paste the text.**

'' FILE: CreateUserListSpreadSheet' CREATED: 13 OCT 2004 GTH' PURPOSE: List the users of a site and create an excel spreadsheet.'Set SFTPServer = WScript.CreateObject("SFTPCOMInterface.CIServer")CRLF = (Chr(13)& Chr(10))   txtServer = "localhost"   txtPort =  "1100"   txtUserName = "eft"   txtPassword = "eft"' On Error Resume NextSFTPServer.Connect txtServer, txtPort, txtUserName, txtPasswordIf Err.Number <> 0 Then   WScript.Echo "Error connecting to '" & txtServer & ":" & txtPort & "' -- " & err.Description & " [" & CStr(err.Number) & "]", vbInformation, "Error"   WScript.Quite(255)Else   WScript.Echo "Connected to " & txtServerEnd Ifset Sites=SFTPServer.SitesSet oExcel = WScript.CreateObject("Excel.Application")oExcel.visible = trueSet oWorkbook = oExcel.Workbooks.AddFor i = 0 to SFTPServer.Sites.Count-1   set theSite=Sites.Item(i)   Set theSheet = oWorkbook.Worksheets.add   theSheet.name = theSite.Name   theSheet.Cells(1, 1) = "Users:"   arUsers = theSite.GetUsers()   For j = LBound(arUsers) to UBound(arUsers)      theSheet.Cells((j+2), 1) = arUsers(j)   Next   theSheet.Columns("A:A").EntireColumn.AutofitNextSet oExcel = nothingSFTPServer.CloseSet theSite = nothingSet SFTPServer = nothing

Secure Account Permissions for EFT

$
0
0

THE INFORMATION IN THIS ARTICLE APPLIES TO:

  • EFT v6.x and later

DISCUSSION

For best security, you should set the least permissions necessary to run EFT on Windows Server 2008 and Windows Server 2012. Instructions are provided below.

Service account permissions for EFT to run on a Windows Server 2008/2012

·Directories (Paths listed are default. Your directories may differ.):

oInstallation Directory (FULL Permissions)

§C:\Program Files (x86)\GlobalSCAPE\EFT Server

§C:\Program Files (x86)\GlobalSCAPE\EFT Server Enterprise

oConfiguration Directory (FULL Permissions)

§C:\ProgramData\GlobalSCAPE\EFT Server

§C:\ProgramData\GlobalSCAPE\EFT Server Enterprise

oWindows Temp Directory (FULL Permissions):

§C:\Windows\Temp

oEFT Site Root directories (FULL Permissions):

§C:\inetpub\EFTRoot (default)

·Registry Entries

oFULL Permissions

32-bit systems:

§HKEY_LOCAL_MACHINE\SOFTWARE\GlobalSCAPE

§HKEY_LOCAL_MACHINE\SOFTWARE\GlobalSCAPE Inc.

§HKEY_LOCAL_MACHINE\SOFTWARE\Network Automation

64-bit systems:

§HKEY_LOCAL_MACHINE\SOFTWARE\Wow6432Node\GlobalSCAPE

§HKEY_LOCAL_MACHINE\SOFTWARE\Wow6432Node\GlobalSCAPE Inc.

§HKEY_LOCAL_MACHINE\SOFTWARE\Wow6432Node\Network Automation

oREAD permissions

§HKEY_CLASSES_ROOT

§HKEY_USERS

·COM Permissions (dcomcnfg.exe). Set the following permissions

oGSPGP

§Allow Local Launch

§Allow Local Activation

§Allow Local Access

§Allow Read Configuration

oGSAWE

§Allow Local Launch

§Allow Local Activation

§Allow Local Access

§Allow Read Configuration

oGSAWE_CLASS_INTERPRETOR

§Allow Local Launch

§Allow Local Activation

§Allow Local Access

§Allow Read Configuration

Also refer to Security Best Practices in the EFT help.

Can I create multiple users in EFT by importing a spreadsheet?

$
0
0

THE INFORMATION IN THIS ARTICLE APPLIES TO:

  • version 6.x and later

QUESTION

Can I create multiple users in EFT by importing a spreadsheet?

ANSWER

For the best user experience and ease of management, using Active Directory/LDAP authentication will populate the Site with the Active Directory users. If you are using Globalscape authentication, you can create users one at a time or create multiple users based on the content of a properly formatted spreadsheet.

The VB script below will import the content of the spreadsheet to create users. You can add as much or as little information as you want. For example, the script below creates multiple users based on the content of column A, and each user has the initial password of "test." You should configure the Site to require the user to change the password upon initial login.

  • This script uses the ICISite interface CreateUser method. To provide more detailed information, you should use the CreateUserEx or CreateUserEx2 method.
  • Be sure that if enforcement of complex passwords is enabled that you provide a complex password in the spreadsheet. Otherwise, disable it during the importing of the users, then re-enable it after you have completed the import.
  • Edit the script values that your EFT is using. That is, the ServerAddress, ServerUsername, ServerPassword, port number for remote access, and the path
    ame of the spreadsheet each need to be edited for your environment.
ServerAddress = "192.168.88.50"
ServerUsername = "root"
ServerPassword = "root"
ExcelFile = "C:\Users.xlsx"
Set SFTPServer = CreateObject("SFTPCOMInterface.CIServer")
SFTPServer.Connect ServerAddress,1100,ServerUsername,ServerPassword
Set sites=SFTPServer.Sites
Set site = sites.Item(0)
Set objExcel = CreateObject("Excel.Application")
Set objWorkbook = objExcel.Workbooks.Open(ExcelFile)
objExcel.Visible = True
i = 1
Do Until objExcel.Cells(i, 1).Value = ""
site.CreateUser objExcel.Cells(i, 1).Value, "test", 0, "Script Created User " & FormatDateTime(Now, vbLongTime)
i = i + 1
Loop
objExcel.Quit

MORE INFORMATION

Regarding the spreadsheet formatting:

Each column is a data set, read from top to bottom.The script starts in column A, row 1, and works its way down until it encounters an empty cell. If you want to add other information (e.g., user emails or passwords), add it to the other columns and edit the script to pull that data.

For finer control, you can use the CreateUserEx method as described in the API Reference. This is useful if, for example, you are importing from a *nix password file and want to push that data into EFT. The thing to note is objExcel.Cells coordinates are (Row, Column), so (5, 1) = A5 in Excel.

Regarding the VB Script:

"i=1" preceeding the Do loop tells the script to start in cell A:1. If your spreadsheet has a header row and the data actually starts on row 2, change this "i=1" to "i=2".

EFT Hangs When Running Script that Contains Configuration Changes

$
0
0

THE INFORMATION IN THIS ARTICLE APPLIES TO:

  • EFT v6.0 and later

DISCUSSION

If you are running a Custom Command consisting of a script that makes configuration changes to EFT (meaning it instantiates EFT’s SFTPCOMInterface.dll), AND if you select the Stop Processing check box under the Action, you run the chance of creating a deadlock that will result in a hung EFT, until the command times out (assuming a timeout was configured for the command).

Globalscape recommends that you use one of the following workarounds:

  • Do not select the Stop Processing check box, which allows the Command to run asynchronously, and greatly reduces or even eliminates the chance of deadlock.
  • -OR-

  • Run the Command from a Timer or Folder Monitor rule, rather than as a trigger related to other configuration or internal changes in EFT (such as account created, IP banned, etc.).

Which SFTP Commands are Supported by EFT Server?

$
0
0

THE INFORMATION IN THIS ARTICLE APPLIES TO:

  • EFT Server, all versions

QUESTION

Which SFTP Commands are Supported by EFT Server?

ANSWER

Below is the list of SFTP commands that EFT Server supports. (Confirmed by GlobalSCAPE Engineers on 3-10-2010.)

For more information about these SFTP commands, refer to http://tools.ietf.org/html/draft-ietf-secsh-filexfer-02.

CommandDescription
SSH_FXP_INIT Protocol Initialization
SSH_FXP_REALPATH Canonicalizing the Server-Side Path Name
SSH_FXP_OPENDIR Opening a Directory
SSH_FXP_READDIR Reading Directories
SSH_FXP_STAT Retrieving Attributes
SSH_FXP_LSTAT Retrieving Attributes
SSH_FXP_FSTAT Retrieving Attributes
SSH_FXP_CLOSE Closing Handles
SSH_FXP_OPEN Opening a File
SSH_FXP_READ Reading Files
SSH_FXP_WRITE Writing Files
SSH_FXP_SETSTAT Setting File Attributes
SSH_FXP_FSETSTAT Setting File Attributes
SSH_FXP_REMOVE Removing Files
SSH_FXP_MKDIR Creating Directories
SSH_FXP_RMDIR Deleting Directories
SSH_FXP_RENAME Renaming Files

Installing or Upgrading DMZ Gateway in a Cluster

$
0
0

THE INFORMATION IN THIS ARTICLE APPLIES TO:

DISCUSSION

This article discusses installing DMZ Gateway in a cluster and upgrading DMZ Gateway in a cluster.

Set up DMZ Gateway in a clustered environment using Microsoft Clustering Services or Globalscape’s monitoring utilities and achieve high availability through failover clustering.

If you have Microsoft Clustering Service (MSCS) deployed, you can use its built-in Resource Monitor to manage the availability of DMZ Gateway. MSCS can manage DMZ Gateway as a generic service.

Clustering setups vary between operating systems, hardware resources used, and various other factors. If you have never set up a server cluster before, please consult your Windows documentation or the Cluster Administrator help file for detailed instructions on setting up a server cluster prior to proceeding. The focus of these instructions is for setting up DMZ Gateway in a pre-existing clustered environment.

Deploying DMZ Gateway in a clustered environment as described in this document is typically the most reliable method to achieve high availability and mitigate down time. For more information specific to clustering with DMZ Gateway, contact Globalscape Customer Support.

For information regarding clustering in Windows Server 2012, refer to the following articles:

Prerequisites for DMZ Gateway in a Clustered Setup

  • Operating System requirements
    • Microsoft Clustering Service as available on:
      • Windows Server 2003 R2 32-bit and 64-bit (IPv6 is not supported)
      • Windows Server 2008 R2 (Standard, Enterprise, and Datacenter editions)
      • Windows Server 2012 R2 (Standard, Enterprise, and Datacenter editions)
  • Hardware and resource requirements
    • A complete system for each node of the cluster (minimum of two)
    • A shared disk resource such as DAS, or SANS, preferably configured as a RAID-redundant array
    • A disk quorum for disk and resource management; a minimum of two adapters per system (one for internal cluster communications, and another for public access)
  • Skill Set
    • A systems or network administrator familiar with the organization’s structure and skilled in networking, Active Directory (AD), and cluster administration.

Configure the DMZ Gateway Cluster

Perform the steps below to configure clustering before setting up DMZ Gateway on the system.

  1. Make sure the hardware is set up correctly and there is a shared disk resource, disk quorum, hub, or switch with Ethernet hookups between the two DMZ Gateways, as well as adapters for the crossover and for outside access, an adequate uninterruptible power supply (UPS) support for each device, and so on.
  2. Make sure you install an operating system that supports clustering on each system.
  3. Install Active Directory (AD) and configure the domain name service (DNS) on the first node. Choose one of DMZ Gateways to be node 1. The administrator password cannot be left blank.
  4. Create an account for the cluster in AD with a non-blank password and assign the account to the Administrators group.
  5. Join the second node to the AD domain.
  6. Reboot, then log in to the first node with the cluster account.
  7. Launch the Cluster Configuration Manager from the Add/ Remove Windows components dialog box and create a new cluster.
  8. Complete the new cluster creation wizard, providing a name for the cluster and cluster account credentials. Allow it to manage the disk, quorum, and other shared resources. Verify the quorum drive is correct, and select the private network option. Use one adapter for the cluster nodes and the other for the public network. Specify the IP address for managing the cluster.

  9. Run the cluster configuration tool on the second node and configure it to be an additional node in the cluster. You will need to provide the cluster name and appropriate cluster account credentials.
  10. After you have completed the cluster configuration wizard, verify that the two nodes are set up properly from the cluster administrator dialog box. (To access the cluster administrator, click Start > Programs > Administrative Tools > Cluster Administrator.)
  11. In the left pane, right-click the Resources folder, click New > Resource, then specify the shared IP address on which the DMZ Gateways will listen. Note that DMZ Gateway captures the IP address when the DMZ Gateway service starts, so if the IP address is changed after that, the service must be restarted to capture it.

Configure DMZ Gateway to Run in a Clustered Environment

After you install and configure clustering on the system, perform the following procedure to configure DMZ Gateway in the cluster.

  1. Install DMZ Gateway on the active node.
  2. Specify the installation directory for DMZ Gateway:
    • For DMZ Gateway 3.0-3.2.x, select the shared disk drive as the installation directory.
    • For DMZ Gateway 3.3.x:
      • For the installation files, specify a location local to the server.
      • For the configuration files, specify a shared disk location.
  3. When the install completes, launch the product. Connect to DMZ Gateway using the administrator account that you created during installation.
  4. Open the Services dialog box (in Windows Administrative Tools), open the DMZ Gateway service Properties dialog box, then switch the startup mode from Automatically to Manual.
  5. Stop the DMZ Gateway service, close the Services dialog box, and launch the Cluster Administrator.
  6. In the Cluster Administrator, make the second node active: In the left pane, click Groups, right-click the appropriate cluster and disk groups, then click Move Group. All resources should move from the first node over to the second node so that the second DMZ Gateway installation succeeds. If not, the shared disk will lock for the second node. It may take a few moments for the resources to switch over.
  7. Install DMZ Gateway on the second node once it is active (also to the shared directory), following steps above, and then exit the Services dialog box without stopping the DMZ Gateway service.
  8. Launch the administration interface, connect to the DMZ Gateway service on the second node, and configure DMZ Gateway.

Integrate DMZ Gateway into the Cluster

After you have set up the DMZ Gateway cluster and configured DMZ Gateway to run in a clustered environment, DMZ Gateway configuration is identical for both DMZ Gateways because both are using the same configuration file stored on the shared disk, saving data to the same place, and sharing the same outside-facing IP address.

To integrate DMZ Gateway into the cluster

  1. Open the cluster administrator. In the left pane, right-click the Resources folder, click New Resource, expand the Create New Resource list, then click Generic Services.
  2. Choose both nodes, select all resources as dependencies, then type the exact service name as displayed in the Windows Services dialog box (e.g., "DMZ Gateway Server"; it must be exact, including case.) Do not choose to replicate the registry settings.
  3. Click Finish to add the service as a resource.

Complete Cluster Configuration and Test

After you set up the DMZ Gateway cluster, configured DMZ Gateway to run in a clustered environment, and integrated DMZ Gateway into the cluster, you should have both nodes configured with shared resources, including a shared IP address, disk array, quorum, and two DMZ Gateways.

Perform tests to ensure the system was correctly configured.

  1. In the Cluster Manager, right-click the DMZ Gateway Server service, then click Bring Online.
  2. Open the DMZ Gateway administration interface and verify that it is online.
  3. In the Cluster Manager, right-click the DMZ Gateway Server service then click Bring Offline.
  4. In the DMZ Gateway administration interface, verify that the service has stopped.
  5. Cause a failover to confirm the service can be started on each node automatically.
  6. Configure the remote server to connect to DMZ Gateway using the cluster IP address (IP address that the cluster shares).
  7. Verify that the DMZ Gateway administration interface has a green light (to show that the server has connected).
  8. Verify that the failover allows the server to continue to be connected to a DMZ Gateway in the cluster.

Your cluster setup is now complete.

If one DMZ Gateway goes down, you lose any transactions in progress until the failover goes online.

Upgrading DMZ Gateway in a Cluster

To upgrade DMZ Gateway in a cluster

  1. Obtain the new installation file(s).
  2. Bring down the cluster (from within the cluster manager). It is critically important that DMZ Gateway service is STOPPED on both nodes!
  3. Verify that the DMZ Gateway service is stopped by logging in to each node and inspecting the service control panel. For extra assurance you can change the startup type to Manual from Automatic. (Make sure to switch it back before you bring the cluster back up in step 7 below.)
  4. Run the installer on the first node and select Upgrade when prompted.
  5. Run the installer on the second node and select Upgrade when prompted.
  6. If you changed DMZ Gateway service startup to Manual in step 4, change it back to Automatic
  7. Bring the cluster back up.
  8. Verify the upgrade was successful:
    1. Verify that DMZ Gateway is running on the primary node.
    2. Disable the primary node and verify secondary node starts up.
    3. Open the DMZ Gateway administration interface and verify that the version number is the same on both nodes (click Help > About).


EFT and SSL Vulnerabilities

$
0
0

THE INFORMATION IN THIS ARTICLE APPLIES TO:

  • EFT, all versions

DISCUSSION

This notice is for informational purposes only and is intended to provide you with the latest update from Globalscape regarding the vulnerabilities in OpenSSL. On June 5, 2014, the Open SSL Foundation issued a warning about a new vulnerability in the open source OpenSSL encryption protocol. CVE-2014-0224 (SSL/TLS MITM vulnerability) has been present in the code for 16 years and makes it possible for an attacker to conduct a man-in-the-middle attack on traffic encrypted with OpenSSL. EFT is minimally affected by the newly discovered vulnerability. Globalscape deems the risk posed by this issue to be low, but we strive to be transparent with any issues that may arise. We will be updating EFT’s OpenSSL library to 0.9.8za in EFT version 7, which will be released the first week of July. In the meantime, we have issued private patch 6.5.18.2 to mitigate this issue in all existing versions of EFT.

CVE

Vulnerability

Globalscape Response

CVE-2014-0224

SSL/TLS MITM vulnerability

This vulnerability does affect EFT but the risk associated with this vulnerability is very low. The risk is low because the malicious Man In The Middle (MITM) attacker needs to have access to the communication channel to inject malicious payload with exact timing during the SSL handshake. Highly improbable to exploit, but we are working on upgrading to 0.9.8za to avoid this risk.

CVE-2014-0221

DTLS recursion flaw

The EFT application is not vulnerable to this vulnerability as EFT does not implement DTLS.

CVE-2014-0195

DTLS invalid fragment vulnerability

The EFT application is not vulnerable to this vulnerability as EFT does not implement DTLS.

CVE-2014-0198

SSL_MODE_RELEASE_BUFFERS NULL pointer dereference

The EFT application is not vulnerable to this vulnerability as EFT uses OpenSSL 0.9.8t libraries; not OpenSSL 1.0.1

CVE-2010-5298

SSL_MODE_RELEASE_BUFFERS session injection or denial of service

The EFT application is not vulnerable to this vulnerability as EFT uses OpenSSL 0.9.8t libraries; not OpenSSL 1.0.1

CVE-2014-3470

Anonymous ECDH denial of service

This vulnerability affects EFT only if an EFT Admin has changed the default ciphers to include ECDH ciphers. Upon install of the EFT application, EFT defaults to the following SSL ciphers on the server side:

AES256-SHA,CAMELLIA256-SHA,DES-CBC3-SHA,AES128-SHA,IDEA-CBC-SHA,RC4-MD5,!EXP

Per the link provided below and the fact that the EFT application uses OpenSSL 0.9.8t and OpenSSL 0.9.8m (FIPS SSL) for all client and server secure file transfers, EFT is vulnerable to the SSL/TLS MITM vulnerability. However, please keep in mind that the attack vector requires the malicious man in the middle to have access to the communication channel between the two ends of the file transfer in order to inject malicious payload in a very carefully timed attack on the SSL handshake, leading this to be a very low risk threat for EFT.

Regarding the Anonymous ECDH denial of service vulnerability, EFT does NOT use ECDH ciphers by default. The EFT application defaults to the following SSL ciphers on the server side:
AES256-SHA,CAMELLIA256-SHA,DES-CBC3-SHA,AES128-SHA,IDEA-CBC-SHA,RC4-MD5,!EXP

As a result, it equates to enabling only the following cipher suites, in SSL/TLS specification nomenclature, in this order:

  • TLS_RSA_WITH_AES_256_CBC_SHA
  • TLS_RSA_WITH_CAMELLIA_256_CBC_SHA
  • SSL_RSA_WITH_3DES_EDE_CBC_SHA
  • TLS_RSA_WITH_AES_128_CBC_SHA
  • SSL_RSA_WITH_IDEA_CBC_SHA
  • SSL_RSA_WITH_RC4_128_MD5

However, if an EFT Admin enables ECDH ciphers that override the SSL/TLS settings with "manually specified ciphers," they can reach out to our Support team and they will assist in verifying and disabling them.

Although the aforementioned vulnerabilities have little to no impact to the EFT application, please know that our Engineering team is working on a solution to address this issue. We should have a patch build available to address this issue soon. Please rest assured we are doing all we can to get in front of this issue.

If you would like more information on the new vulnerabilities in OpenSSL, please view the following link:

https://www.openssl.org/news/secadv_20140605.txt

If you have any further questions or concerns, please do not hesitate to contact Support.

Web Transfer Client File List Shows a Maximum of 500 Files and Folders

$
0
0

THE INFORMATION IN THIS ARTICLE APPLIES TO:

  • EFT Server's Web Transfer Client version 6.5.x and earlier (does not apply to EFT v7.x or later)

QUESTION

When using the EFT Server Web Transfer Client (WTC), the file list displays only 500 files even though more files are present. How can I display more than 500 files or folders?

ANSWER

By default, the WTC is designed to automatically filter the file list and display only the first 499 files and folders. Once that limit is reached, the WTC will prompt the user to use the FILTER feature to find the files that they want.

Limiting the file list to 500 files helps to avoid performance issues when browsing folders that contain very large numbers of files and folders. Depending upon the size of the folder and the capabilities of the computer running the browser, performance of the system can degrade significantly.

To change the threshold at which this automatic filtering is enforced, see the instructions below and the attached files.

Note: Editing the registry is for advanced users only!

To alter the automatic filtering behavior to increase the number of files displayed, do the following on the EFT Server computer:

In EFT Server version 6.1 and later

  1. Stop the EFT Server Service.
  2. Go to the EFTClient directory. [These are default install locations and may vary per environment.]
    • In version 6.1 -6.2:
      • Windows (32bit): C:\Program Files\GlobalSCAPE\EFT Server\web\contrib\EFTClient
      • Windows (64bit): C:\Program Files (x86)\GlobalSCAPE\EFT Server\web\contrib\EFTClient
    • In version 6.3 - 6.5.x
      • Windows (32bit): C:\Program Files\GlobalSCAPE\EFT Server\web\public\EFTClient\wtc
      • Windows (64bit): C:\Program Files (x86)\GlobalSCAPE\EFT Server\web\public\EFTClient\wtc
  3. Open the file EFTWebClientLogic.js
  4. Do a search for: “var MAX_FILES_IN_PANE = 500;”
  5. Change the value of 500 to the value that you want to allow.
  6. Save the file and close.
  7. This step applies to versions prior to 6.3 only. For version 6.3, skip to step 8.
    1. Copy and paste the following text into a text file and name the file increase-wtc-filter-threshold.reg.

      [Edit the path to match for the location of the js file.]

      • Windows (32bit):
        Windows Registry Editor Version 5.00[HKEY_LOCAL_MACHINE\SOFTWARE\GlobalSCAPE Inc.\EFT Server 4.0\EFTClient]"http-applet:/eftclient/EFTWebClientLogic.js"="C:\\Program Files\\GlobalSCAPE\\EFT Server\\web\\contrib\\EFTClient\\EFTWebClientLogic.js"
      • Windows (64bit):
        Windows Registry Editor Version 5.00[HKEY_LOCAL_MACHINE\SOFTWARE\Wow6432Node\GlobalSCAPE Inc.\EFT Server 4.0\EFTClient]"http-applet:/eftclient/EFTWebClientLogic.js"="C:\\Program Files (x86)\\GlobalSCAPE\\EFT Server\\web\\contrib\\EFTClient\\EFTWebClientLogic.js"
    2. Double click the .reg file you just created to insert the register values into the registry.
    3. Click Yes to accept the registry modification.
    4. Verify that it was successful and click OK to acknowledge.
  8. Start the EFT Server Service.
  9. Open the WTC to verify success.

In EFT Server version 6.0.x and earlier

  1. Download and extract the files from increase-wtc-filter-threshold.zip. The zip file contains these instructions, Calendar.js, and increase-wtc-filter-threshold.reg.
  2. Copy Calendar.js into a subfolder of the EFT Server installation folder named "EFTClient." (e.g., C:\Program Files\GlobalSCAPE\EFT\web\contrib\EFTClient)
  3. Open Calendar.js in a text editor (such as Notepad). At the bottom of the file, edit the script that overrides the default behavior, shown below:
  4. MAX_FILES_IN_PANE = 5000;

    to change the value of "5000" to the number that is appropriate for your file systems and browser computer performance capabilities.

    (Note that the Web Client default is 500.)

  5. Open increase-wtc-filter-threshold.reg in a text editor.
  6. Modify the value of the path (to the right of the equals ("=") sign) so that it matches the physical path to the file Calendar.js that you saved in step #2, above.

    Windows Registry Editor Version 5.00

    [HKEY_LOCAL_MACHINE\SOFTWARE\GlobalSCAPE Inc.\EFT Server 4.0\EFTClient]

    "use_registry"=dword:00000001

    "http-applet:/eftclient/Calendar.js"="C:\\Program Files\\GlobalSCAPE\\EFT\\web\\contrib\\EFTClient\\Calendar.js"

    • For 64-bit systems, the key is HKEY_LOCAL_MACHINE\SOFTWARE\Wow6432Node\GlobalSCAPE Inc.\EFT Server 4.0\EFTClient
    • Be sure that all backslashes ("\") in the physical path reference are saved as two backslashes ("\\") in the file.
    • Be sure the path reflects your installation.
  7. STOP the GlobalSCAPE EFT Server service.
  8. Double click increase-wtc-filter-threshold.reg to merge the value into the EFT Server computer's registry.
  9. START the GlobalSCAPE EFT Server service.
  10. Validate the changes by opening a browser and logging in to the Web Transfer Client.

Overriding the Hard-Coded Location of Web Transfer Client Files

$
0
0

THE INFORMATION IN THIS ARTICLE APPLIES TO:

  • EFT Server version 4.x-6.2
This article is about overriding the hard-coded location of Web Transfer Client files; for example, if you created a custom WTC file, you would point the registry to the new file.

This registry key may not function properly in Firefox, but is known to work in Internet Explorer.

For details of customizing / rebranding / editing WTC files, for example, if you want to edit the text that appears after a user has logged out of the Web Transfer Client, refer to KB article #10470.

DISCUSSION

You can override the hard-coded location of the Web Transfer Client (WTC) files by setting registry values to indicate the new location of the files you would like to use.

You can add each of the keys you need to a reg file in the following format:

32-bit OS:

Windows Registry Editor Version 5.00

[HKEY_LOCAL_MACHINE\SOFTWARE\GlobalSCAPE Inc.\EFT Server 4.0\EFTClient]

"use_registry"=dword:00000001

"http-applet:/EFTClient/EFTWebClient.htm"="PATH\\EFTWebClient.htm"

64-bit OS:

Windows Registry Editor Version 5.00

[HKEY_LOCAL_MACHINE\SOFTWARE\Wow6432Node\GlobalSCAPE Inc.\EFT Server 4.0\EFTClient]

"use_registry"=dword:00000001

http-applet:/EFTClient/EFTWebClient.htm"="PATH\\EFTWebClient.htm"

(Note: Edit the PATH to the location of the target EFTClient directory.)

The registry key name (e.g., http-applet:/EFTClient/EFTWebClient.htm) indicates the relative path and source file you want to map. The value of that key indicates the absolute path and target file (e.g., C:\\Program Files\\GlobalSCAPE\\EFT Server Enterprise\\web\\public\\EFTClient\\EFTWebClient.htm -- this is simply an example; your path will differ depending on where you installed EFT Server and the version of EFT Server/EFT Server Enterprise that is installed).

You can map to a new location for the following files:

FileFunction
eftwebclient.htm Used for a custom Web Transfer Client page
EFTStyles.css Style sheet that controls the appearance of the Web Transfer Client
NoAppletLicenses.htmMessage displayed when no Web Transfer Client licenses are available.

You must restart the EFT Server service for the new paths to take effect.

Overriding the Manage Account Page when the WTC is not enabled

With the following key, you can override the Manage Account page when the WTC is not enabled:

32-bit OS:

[HKEY_LOCAL_MACHINE\SOFTWARE\GlobalSCAPE Inc.\EFT Server 4.0\EFTClient]

"use_registry"=dword:00000001

"http:/ManageAccount"="C:\\Program Files\\GlobalSCAPE\\EFT Server Enterprise\\web\\public\\EFTClient\\ManageAccountCustom.htm"

64-bit OS:

[HKEY_LOCAL_MACHINE\SOFTWARE\Wow6432Node\GlobalSCAPE Inc.\EFT Server 4.0\EFTClient]

"use_registry"=dword:00000001

"http:/ManageAccount"="C:\\Program Files\\GlobalSCAPE\\EFT Server Enterprise\\web\\public\\EFTClient\\ManageAccountCustom.htm"

(Note: Edit the PATH to the location of the target EFTClient directory.)

You must restart the EFT Server service for the new paths to take effect.

EFT Server uses different contexts depending on whether the WTC is ON or OFF. Setting up the same functionality for WTC-less mode requires that you change:

"http-applet:/"

to:

"http:/"


Below are some less commonly used Web Transfer Client Registry Overrides (usually only added with assistance from GlobalSCAPE Customer Support.)

FileFunction:
http-applet:/eftclientMaps the entire "/EFTClient" URL to a physical path. Useful in internal debugging / testing scenarios.
http-applet:/favicon.icoDesignate a physical path to a "favorite icon" that browsers use in the address bar and in bookmarks to represent the site.
http-applet:/eftclient/META-INF/services/org.apache.commons.logging.LogFactoryInternal applet file.
http-applet:/org/apache/log4j/Logger.classInternal applet file.
http-applet:/javazoom/transfer/client/util/resources.classInternal applet file.
http-applet:/javazoom/transfer/client/util/resources_en.classInternal applet file.
http-applet:/javazoom/transfer/client/util/resources_en_US.classInternal applet file.
http-applet:/javazoom/transfer/client/util/resources_en_US.propertiesInternal applet file.
http-applet:/eftclient/commons-logging.propertiesPoints to a configuration file that can enable extended Applet debugging in the Java console.
http-applet:/javazoom/transfer/client/utilInternal applet file.
http-applet:/org/apacheInternal applet file.
http-applet:/ManageAccountPoints to an HTML page that is served in response to a password change request / force password change. The HTML can be edited for custom look-and-feel.
You must restart the EFT Server service for the new paths to take effect.

For details of customizing / rebranding the WTC, refer to KB article #10470.

Can I create static cookies to use with the Web Transfer Client (WTC)?

$
0
0
THE INFORMATION IN THIS ARTICLE APPLIES TO:
  • EFT Server, version 6.1 and later
    (Does not apply to the HTML 5 version of WTC available in EFT v7.x and later as it does not use the JRE.)

QUESTION

Can I create static cookies to use with the Web Transfer Client (WTC)?

ANSWER

Yes, you can pass static cookie values to the WTC Java applet.

In the EFTWebClient.htm file (e.g., C:\Program Files\Globalscape\EFT Server Enterprise\web\public\EFTClient\wtc\EFTWebClient.htm), you can specify a cookie parameter and a cookie value for each browser type. The cookie references must increment cookiename/cookievalue, cookiename1/cookievalue1, cookiename2/cookievalue2, and so on, and be different from those already used in the file. (You can have up to 16 param/value pairs.)

To specify the cookies

  1. Make a backup copy of EFTWebClient.htm, and then open it in a text editor.
  2. Under "Load applet based on browser type," in a separate section for each browser type, you will find parameters for cookies:
  3. <PARAM NAME = "param5" VALUE="cookiename"> \
    <PARAM NAME = "value5" VALUE="websessionid"> \
    <PARAM NAME = "param6" VALUE="cookievalue"> \
    <PARAM NAME = "value6" VALUE="<%=session_id%>"> \
    <PARAM NAME = "param8" VALUE="cookieoverwrite"> \
    <PARAM NAME = "value8" VALUE="true"> \
    <PARAM NAME = "param15" VALUE="sso_cookies"> \
    <PARAM NAME = "value15" VALUE="<%=sso_cookie%>"> \

  4. Add the appropriate parameters for each browser type, such as:
  5. For Firefox:

    param10 = "cookiename1" \>
    value10 = "testcookie" \
    param11 = "cookievalue1" \
    value11 = "testcookievalue" \

    For Internet Explorer, Chrome, and other browsers :

    <PARAM NAME = "param10" VALUE="cookiename1"> \
    <PARAM NAME = "value10" VALUE="testcookie"> \
    <PARAM NAME = "param11" VALUE="cookievalue1"> \
    <PARAM NAME = "value11" VALUE="testcookievalue"> \

  6. Save the file.
  7. Open the WTC in a browser and log in to verify your changes.

Cannot connect to EFT via Web Page

$
0
0

THE INFORMATION IN THIS ARTICLE APPLIES TO:

  • EFT Server

SYMPTOM

Unable to connect to EFT Server via Web (PTC or Web Transfer Client)

RESOLUTION

Ensure the Windows Firewall is not blocking access. In most Windows operating systems, the Windows Firewall is turned on by default.

How much memory does the Web Transfer Client use?

$
0
0

THE INFORMATION IN THIS ARTICLE APPLIES TO:

  • EFT Server Web Transfer Client versions that use the JRE

QUESTION

How much memory does the Web Transfer Client use?

ANSWER

When a user connects to the Web Transfer Client (WTC), EFT Server downloads a jar file, various HTML/Javascript/CSS files, and some images. When the browser launches the applet and files are being transferred, then the browser (through DHTML) and the Java Virtual Machine will also consume memory, and that memory will increase as more transfers are initiated. Including the Java Virtual Machine (which becomes a child process for the Web browser) and WTC logic, Internet Explorer consumes approximately 55MB. This is primarily because the Java Runtime Environment is about 40MB, which must be loaded into browser memory to execute Java applications. But this is only in-memory utilization, and NOT downloaded from EFT Server.

  • The WTC jar file is loaded once into the cache of the connecting browser, and is 462 KB.
  • The various HTML/Javascript/CSS files that are deployed total 323 KB.
  • Images, some of which show up immediately and others of which are only loaded at certain times (like progress bars), total about 60 KB.

The total memory consumed, counting the JVM and Internet Explorer is approximately 55-56 MB.

Refer to the EFT Server Online Help for more information about the Web Transfer Client.

Error occurs when installing Java for WTC going through a proxy

$
0
0

THE INFORMATION IN THIS ARTICLE APPLIES TO:

  • EFT Server, version 6.x and later that use the JRE

SYMPTOM

When using the Web Transfer Client for the first time, an error occurs while installing Java going through a proxy.

Java appears to relaunch, and then the Web Transfer Client (WTC) loads.

RESOLUTION

No resolution is available. After the initial loading of the WTC, everything works as expected. This issue is expected to be fixed in a subsequent version of the JRE.

MORE INFORMATION

Once a JRE version is released that addresses this problem, the WTC will use it since it attempts to download the latest JRE whenever no JRE is present on the client machine.

This error is coming from jaureg.exe, which is part of the Java auto updater. Similar known issues are documented here: http://bugs.sun.com/bugdatabase/view_bug.do;jsessionid=885744f11b55c60ed0fddc4603f6?bug_id=6911088

http://bugs.sun.com/bugdatabase/view_bug.do;jsessionid=5288ea4b825d095f0bf29977ada?bug_id=6925315


Disable X-FRAME-OPTIONS for WTC and PTC

$
0
0

THE INFORMATION IN THIS ARTICLE APPLIES TO:

  • EFT Server Enterprise version 6.4 - 6.5.x

DISCUSSION

Starting with EFT Server v6.4, the X-FRAME-OPTIONS header will be sent with a value of SAMEORIGIN for the Plain-Text Client (PTC) and the Web Transfer Client (WTC). You can disable it with the registry value below:

32-bit: HKEY_LOCAL_MACHINE\Software\GlobalSCAPE Inc.\EFT Server 4.0\EFTClient\

64-bit: HKEY_LOCAL_MACHINE\SOFTWARE\Wow6432Node\GlobalSCAPE Inc.\EFT Server 4.0\EFTClient\

DWORD: disable_xframeoptions = 00000001

The service must be restarted after setting this value.

Can I customize the Web Transfer Client Web page?

$
0
0

THE INFORMATION IN THIS ARTICLE APPLIES TO:

SYMPTOM

Can I customize the Web Transfer Client Web page?

RESOLUTION

If you are comfortable editing CSS and HTML pages, the Web Transfer Client (WTC) can be easily customized to suit your needs. For example, you can edit the colors and fonts in the style sheet, and you can replace the EFT Server logo (header.gif) with your own company's logo of the same size. The appearance of the Web Transfer Client is controlled by the style sheet, EFTStyles.css. The image files can be substituted with your custom images. If you lack the resources to edit CSS and HTML pages yourself, GlobalSCAPE's Professional Services group can create a custom Web Transfer Client page for you.

Before you make any changes, make a backup copy of the style sheet. (For detailed instructions for editing CSS files, refer to http://www.w3.org/MarkUp/Guide/Style.)

The Web Transfer Client Web page is hard coded in the EFT Server code; however, you can add a registry key that will use an edited version of the Web Transfer Client Web page called EFTWebClient.htm. EFTWebClient.htm is not used by default; you have to create a registry key to "tell" EFT Server to use that file. (Otherwise, the hard-coded version is used.)

The EFT Server code that creates EFTWebClient.htm differs between versions; therefore, if you copy EFTWebClient.htm from one version to the next, you might not get the same results. Be sure to keep track of the changes you have made to the files (i.e., comment your code) and merge your changes into the next version when you upgrade. Tools such as Beyond Compare (by Scooter Software) or WinMerge (Open Source) can come in handy for porting custom changes over to new versions.

  • In EFT Server 5 and prior, the default location of the Web Transfer Client files is C:\Program Files\GlobalSCAPE\EFT\EFTClient.
  • In EFT Server v6, the default location of the Web Transfer Client files is C:\Program Files\GlobalSCAPE\EFT Server\Client or C:\Program Files\GlobalSCAPE\EFT Server Enterprise\Client
  • In v6.1 and later, the default path of the Web Transfer Client files is C:\Program Files\GlobalSCAPE\EFT Server\web\contrib\EFTClient or C:\Program Files\GlobalSCAPE\EFT Server Enterprise\web\contrib\EFTClient. Edited pages should be saved in the \custom\ folder, keeping the original files unchanged.

You do not need to create a copy of EFTWebClient.htm or obtain it from any other source if you are using v6.1 or later.

In v6.0.x and earlier, do the following to create a copy of EFTWebClient.htm:

  1. Create a test account for the EFT Server.
  2. Open up a web browser and log into the EFT Server using the test account.
  3. Save the web page as an .htm file.
    1. For IE, click File > Save As.
    2. Click Save as type > Webpage, HTML only, and save the file as EFTWebClient.htm.

To use EFTWebClient.htm (for v6-6.1.x)

  1. Make your changes to EFTWebClient.htm, save a copy, then paste it into the EFT Server installation folder's Client or EFTClient subfolder, depending on your version.
  2. Create the registry entry for the customized WTC page, "http-applet:/EFTClient/EFTWebClient.htm" and set the value to the physical path to the new file. You can add the key to a .reg file in the following format:

    Windows Registry Editor Version 5.00

    [HKEY_LOCAL_MACHINE\SOFTWARE\GlobalSCAPE Inc.\EFT Server 4.0\EFTClient]

    "use_registry"=dword:00000001

    "http-applet:/EFTClient/EFTWebClient.htm"="C:\\Program Files\\GlobalSCAPE\\EFT\\EFTClient\\EFTWebClient.htm"

    --Be sure to provide the correct path to the EFTWebClient.htm file.--

    (Note that your path may be different, depending on where you installed EFT Server.)

    ****On a 64-bit OS, the path is:

    [HKEY_LOCAL_MACHINE\SOFTWARE\Wow6432Node\GlobalSCAPE Inc.\EFT Server 4.0\EFTClient]

  3. Stop and start the EFT Server service for your changes to take effect.

  4. Open the WTC page in your browser to confirm that the changes you want are there.

EXAMPLE

To edit the logout text in EFTWebClient.htm

You can edit the text that appears after a user has logged out of the Web Transfer Client to add to or remove the existing text:

  1. In EFTWebClient.htm, find the following line that handles the "logout" button:

    <td>

    <img src="/EFTClient/btnLogout.gif" id="btnLogout" name="btnLogout" onclick="doLogout(); showLogoutPage();" value="Logout"/>

    </td>

  2. "showLogoutPage()" is a javascript function that writes the logout page to the browser window. The function is found in EFTWebClientLogic.js, but you can make your own function inside EFTWebClient.htm to call instead of the default one. Update the code to point to a new function as shown below (change in red text):
    <td><img src="/EFTClient/btnLogout.gif" id="btnLogout" name="btnLogout" onclick="doLogout(); showLogoutPage_New();" value="Logout"/></td>

    Add a new function to the "javascript" portion at the top of the page (between the <head> tags), making a function that reads as follows (you can edit the displayed text as you please, shown in red text below):

    <script language="javascript">

    function showLogoutPage_New()

    {document.write("<html xmlns=\"http://www.w3.org/1999/xhtml\">");

    document.write("<head>");

    document.write(" <title>WTC Logged out</title>");

    document.write(" <meta http-equiv=\"Content-Type\" content=\"text/html; charset=UTF-8\">");

    document.write(" <title>GlobalSCAPE&reg; EFT Web Transfer Client</title>");

    document.write(" <link href=\"/EFTClient/EFTStyles.css\" rel=\"stylesheet\" type=\"text/css\">");

    document.write("</head>");

    document.write("<body>");

    document.write("<br/><br/><br/><br/>");

    document.write("<hr color=\"#000000\" size=\"1\"></hr>");

    document.write("<table align=\"center\" border=\"0\" style=\"position:relative;top: left: 0px;\" >");

    document.write("<tr><br>");

    document.write("<td valign =\"middle\">");

    document.write("<strong>You are now logged out.</strong><br>");

    document.write("Directory listings and other screens may be retained by<br>");

    document.write("your browser's history. We recommend you delete<br>");

    document.write("temporary files if extremely sensitive data is involved.<br><br>");

    document.write("<strong>Security notice:</strong><br>");

    document.write("When logging on to this server, we will never<br>");

    document.write("ask for any personal information other than<br>");

    document.write("your account login name and password.<br><br>");

    document.write("If you are ever prompted for additional personal<br>");

    document.write("information upon attempting to log in, please<br>");

    document.write("contact the server administrator.<br>");

    document.write("</td>");

    document.write("</tr>");

    document.write("</table>");

    document.write("</body>");

    document.write("</html>");

    document.close();

    } </script>

  3. Save your changes and paste EFTWebClient.htm into the EFT Server installation folder's Client or EFTClient subfolder.
  4. Stop and start the EFT Server service for your changes to take effect.
  5. Open the WTC page in your browser to confirm that the changes you want are there.
  6. Logout to ensure the logout text that you want appears correctly.

(Refer to http://kb.globalscape.com/article.aspx?id=10505 for more WTC-specific keys.)

Buttons and icons do not appear in the Web Transfer Client (WTC) when connected via HTTPS using Apple's Safari browser on Windows

$
0
0

THE INFORMATION IN THIS ARTICLE APPLIES TO:

  • EFT Server and the Web Transfer Client (JRE versions) on Windows computers using the Safari browser

SYMPTOM

Buttons and icons do not appear in the Web Transfer Client (WTC) when connected via HTTPS using Apple's Safari browser on Windows. (Boxes with question marks are displayed instead of the buttons and icons.)

RESOLUTION

Release 4.0.3 of the Windows version of the Safari browser corrected this issue. Please visit http://support.apple.com/downloads/Safari_4_0_3 to download the latest version of the Safari browser for Windows.

MORE INFORMATION

In Windows versions of the Safari browser before version 4.0.3, the browser times out before all of the graphics are downloaded that are used to display the buttons and icons; however, the functions provided by the buttons and icons are still available.

Load balanced Folder Monitor events fail to process files in an HA clustered environment

$
0
0

THE INFORMATION IN THIS ARTICLE APPLIES TO:

  • EFT version 7

SYMPTOM

Server Message Block (SMB) caching can cause load balanced Folder Monitor events to fail to process files when using EFT 7.0 under an HA clustered environment.

RESOLUTION

To prevent the Folder Monitor events from failing, create the following registry settings:

[HKEY_LOCAL_MACHINE\SYSTEM\CurrentControlSet\Services\LanmanWorkstation\Parameters]

"FileInfoCacheLifetime"=dword:00000000

"FileNotFoundCacheLifetime"=dword:00000000

"DirectoryCacheLifetime"=dword:00000000

MORE INFORMATION

http://blogs.msdn.com/b/winsdk/archive/2009/07/10/file-exists-access-getfileattributes-findfirstfile-findnextfile-stat-behavior-over-smb-2-0.aspx
http://technet.microsoft.com/library/ff686200%28ws.10%29.aspx

Adjusting the ARM Queue Behavior

$
0
0

THE INFORMATION IN THIS ARTICLE APPLIES TO:

  • EFT Server v6.3 and later

DISCUSSION

The following registry settings control the behavior of the queue used to write to the ARM database. If the queue backs up, it will make threads wait until space is available. If you have enabled DEBUG logging for ARM (see "Logging" below), when you start EFT Server, it will log messages indicating that these registry settings are enabled.

32-bit:

HKEY_LOCAL_MACHINE\SOFTWARE\GlobalSCAPE Inc.\EFT Server 4.0\

64-bit:

HKEY_LOCAL_MACHINE\SOFTWARE\Wow6432Node\GlobalSCAPE Inc.\EFT Server 4.0\

ARMQueueSize

  • The maximum size of the ARM auditing queue. You should first enable DEBUG logging and set the “ARMLogMinStalledThreads” registry setting (below) to 1, then review the EFT.log file and see if it is logging WARN messages about stalled threads. This would be evidence that the queue is falling behind.
  • Type: REG_DWORD
  • Default when not specified: 10 (1000 in v7 and later)
  • Minimum allowed when specified: 10 (1000 in v7 and later)

ARMLogStalledThreadMinDuration

  • Type: REG_DWORD
  • Default when not specified: 1000 (1 second)
  • Minimum allowed when specified: 1000 (1 second)
  • The duration to use to determine if a thread should be considered “stalled.” Meaning if this is set to 1000 then any thread that waits longer than 1 second is classified as stalled. This is used just for logging purposes.

ARMLogMinStalledThreads

  • Type: REG_DWORD
  • Default when not specified: 0
  • The number of stalled threads that must be present before logging. If it is set to 1 or higher, information about stalled threads is logged to EFT.log under the ARM logger. Set this to 1 temporarily to see if anything shows up in the log. Be aware that in extreme situations this could, in theory, make it log a ton of WARN messages. If so then a higher value should be used to lessen the verbosity.

Logging

In the logging.cfg file (e.g., C:\ProgramData\Globalscape\EFT Server Enterprise\logging.cfg), enable DEBUG logging for the "ARM" log to output statistical information concerning the size of the queue and whether threads are stalling.

Log Messages

The following log message are created when the queue is filling up and at server startup:

  • A WARN level message to the "ARM.Queue" log when the queue is filling up and threads are backing up waiting to audit. You have to set "ARMLogMinStalledThreads" to 1 or greater to enable this.

For example:

05-16-12 10:57:52,258 [1316] WARN ARM.Queue <> - The ARM queue had 8 threads waiting over 1001 seconds over the last 301 milliseconds

  • A DEBUG level message to the"ARM.Queue" log with statistics for the queue. Output every 5 minutes.

For example:

05-16-12 10:57:52,258 [1316] DEBUG ARM.Queue <> - Queue stats over the last 301 seconds:

10094 items enqueued

11 is the largest recorded queue size

8 threads waited over 1001 milliseconds

average queue size 4.53

  • (Logged at Server start) A DEBUG level message to "ARM.Queue" log displaying the queue size if the "ARMQueueSize" registry key is specified and value is > 10.

For example:

05-16-12 10:47:51,320 [1560] DEBUG ARM.Queue <> - Queue size set to 11

  • (Logged at Server start) A DEBUG level message to "ARM.Queue" log displaying the queue size if the "ARMLogStalledThreadMinDuration" registry key is specified an value > 1000:

For example:

05-16-12 10:47:51,320 [1560] DEBUG ARM.Queue <> - Stalled thread minimum duration set to 1001

  • (Logged at Server start) A DEBUG level message to "ARM.Queue" log displaying the queue size if the "ARMLogMinStalledThreads" registry key is specified and value > 0

For example:

05-16-12 10:47:51,320 [1560] DEBUG ARM.Queue <> - Minimum number of stalled threads to log set to 1ARMLogMinStalledThreads > 0 output

Viewing all 479 articles
Browse latest View live